

Intro
Graphs are an essential tool for data analysis and visualization in Excel. They help to present complex data in a clear and concise manner, making it easier to understand and interpret. One of the most useful features of Excel graphs is the ability to zoom in and out of specific data ranges. This allows users to focus on specific parts of the graph, examine data points in more detail, and identify trends and patterns that may not be immediately apparent.
Zooming in on an Excel graph can be particularly useful when working with large datasets or when trying to identify specific data points within a graph. By zooming in, users can see more detail and gain a better understanding of the data. In this article, we will explore how to zoom in on an Excel graph, including the different methods and techniques that can be used.
Why Zoom in on an Excel Graph?

There are several reasons why you might want to zoom in on an Excel graph. Here are a few:
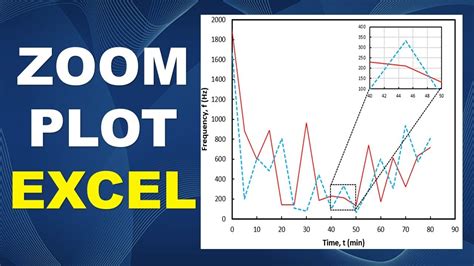
- Examine data points in more detail: By zooming in on a specific part of the graph, you can see more detail about individual data points. This can be useful for identifying trends and patterns in the data.
- Identify trends and patterns: Zooming in on a graph can help you identify trends and patterns that may not be immediately apparent. By focusing on specific parts of the graph, you can see how the data is changing over time.
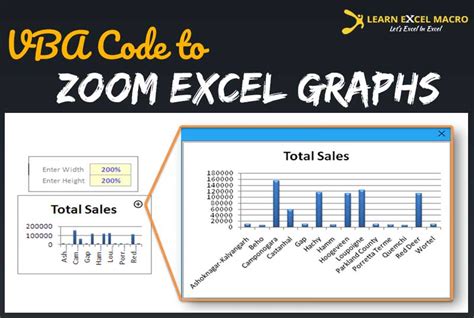
- Focus on specific data ranges: If you have a large dataset, you may want to focus on specific data ranges. Zooming in on a graph allows you to do this, making it easier to analyze the data.
Methods for Zooming in on an Excel Graph

There are several methods for zooming in on an Excel graph. Here are a few:
- Using the zoom buttons: Excel provides a set of zoom buttons that can be used to zoom in and out of a graph. These buttons can be found in the "View" tab of the ribbon.
- Using the mouse wheel: You can also use the mouse wheel to zoom in and out of a graph. Simply place the cursor over the graph and roll the mouse wheel forward to zoom in or backward to zoom out.
- Using the "Zoom" feature: Excel also provides a "Zoom" feature that can be used to zoom in and out of a graph. This feature can be found in the "View" tab of the ribbon.
How to Zoom in on an Excel Graph
Here are the steps to follow to zoom in on an Excel graph:
- Select the graph that you want to zoom in on.
- Go to the "View" tab of the ribbon.
- Click on the "Zoom" button.
- Select the "Zoom In" option from the dropdown menu.
- Use the mouse wheel to zoom in and out of the graph.
Alternatively, you can also use the zoom buttons to zoom in and out of the graph.
Using the Zoom Buttons
The zoom buttons are located in the "View" tab of the ribbon. To use the zoom buttons, follow these steps:
- Select the graph that you want to zoom in on.
- Go to the "View" tab of the ribbon.
- Click on the "Zoom In" button.
The graph will zoom in to the selected data range.
Using the Mouse Wheel
You can also use the mouse wheel to zoom in and out of a graph. To use the mouse wheel, follow these steps:
- Select the graph that you want to zoom in on.
- Place the cursor over the graph.
- Roll the mouse wheel forward to zoom in or backward to zoom out.
The graph will zoom in and out as you roll the mouse wheel.
Gallery of Excel Graph Zooming
Excel Graph Zooming Image Gallery


We hope this article has provided you with a comprehensive guide on how to zoom in on an Excel graph. By following the steps outlined above, you can easily zoom in and out of specific data ranges and gain a better understanding of your data. If you have any further questions or need additional assistance, please don't hesitate to comment below.