
Stem and leaf plots are a great way to visually display the distribution of a dataset. They are particularly useful for showing the shape of the data, including the central tendency, variability, and outliers. While Excel doesn't have a built-in function to create stem and leaf plots, there are several ways to create one using the software. In this article, we will explore five methods to create a stem and leaf plot in Excel.
Method 1: Manual Stem and Leaf Plot
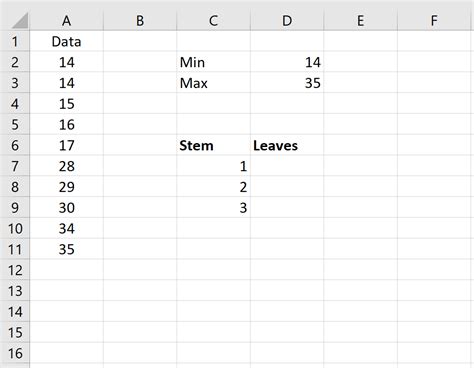
One way to create a stem and leaf plot in Excel is to do it manually. This method is useful for small datasets. To create a manual stem and leaf plot, follow these steps:
- Enter your data in a column.
- Create a new column to the left of the data column. This will be the stem column.
- In the stem column, enter the first digit of each data point. For example, if the data point is 12, enter 1 in the stem column.
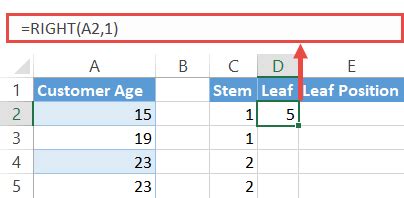
- Create a new column to the right of the data column. This will be the leaf column.
- In the leaf column, enter the last digit of each data point. For example, if the data point is 12, enter 2 in the leaf column.
- Sort the data by the stem column.
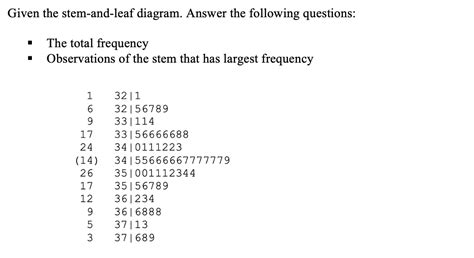
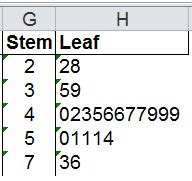
- The resulting plot will have the stem values on the left and the corresponding leaf values on the right.
Using Formulas to Create a Stem and Leaf Plot
Method 2: Using Formulas
Another way to create a stem and leaf plot in Excel is to use formulas. This method is useful for larger datasets. To create a stem and leaf plot using formulas, follow these steps:
- Enter your data in a column.
- Create a new column to the left of the data column. This will be the stem column.
- In the stem column, enter the formula
=INT(A1/10)where A1 is the cell containing the data point. This will extract the first digit of the data point. - Create a new column to the right of the data column. This will be the leaf column.
- In the leaf column, enter the formula
=MOD(A1,10)where A1 is the cell containing the data point. This will extract the last digit of the data point. - Sort the data by the stem column.
- The resulting plot will have the stem values on the left and the corresponding leaf values on the right.
Using PivotTables to Create a Stem and Leaf Plot
Method 3: Using PivotTables
PivotTables are a powerful tool in Excel that can be used to create a stem and leaf plot. To create a stem and leaf plot using PivotTables, follow these steps:
- Enter your data in a column.
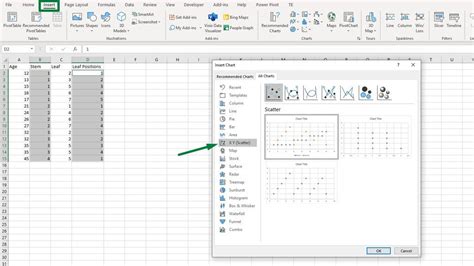
- Create a PivotTable by going to the "Insert" tab and clicking on "PivotTable."
- Drag the data column to the "Row Labels" area.
- Right-click on the data column in the "Row Labels" area and select "Group."
- In the "Grouping" dialog box, select "Stem and Leaf" as the grouping method.
- Set the "Stem" field to the first digit of the data point and the "Leaf" field to the last digit of the data point.
- The resulting PivotTable will have the stem values on the left and the corresponding leaf values on the right.

Method 4: Using Excel Add-ins
There are several Excel add-ins available that can be used to create a stem and leaf plot. One such add-in is the "Analysis ToolPak" add-in. To create a stem and leaf plot using the Analysis ToolPak add-in, follow these steps:
- Enter your data in a column.
- Go to the "Data" tab and click on "Data Analysis."
- Select "Stem and Leaf Plot" from the list of available tools.
- Select the data range and click "OK."
- The resulting plot will have the stem values on the left and the corresponding leaf values on the right.
Using VBA Macros to Create a Stem and Leaf Plot
Method 5: Using VBA Macros
VBA macros can also be used to create a stem and leaf plot in Excel. To create a stem and leaf plot using VBA macros, follow these steps:
- Enter your data in a column.
- Open the Visual Basic Editor by pressing "Alt + F11" or by navigating to the "Developer" tab and clicking on "Visual Basic."
- In the Visual Basic Editor, insert a new module by clicking on "Insert" and then "Module."
- Paste the following code into the module:
Sub StemAndLeafPlot()
    Dim data As Range
    Set data = Range("A1:A100") 'adjust the range to your data
    Dim stem As Range
    Set stem = Range("B1:B100") 'adjust the range to your stem column
    Dim leaf As Range
    Set leaf = Range("C1:C100") 'adjust the range to your leaf column

    For Each cell In data
        stem.Cells(cell.Row, 1).Value = Int(cell.Value / 10)
        leaf.Cells(cell.Row, 1).Value = Mod(cell.Value, 10)
    Next cell

    Range("B1:C100").Sort key1:=Range("B1"), order1:=xlAscending, header:=xlNo
End Sub
- Adjust the ranges to your data and stem and leaf columns.
- Run the macro by clicking on "Run" or by pressing "F5."
- The resulting plot will have the stem values on the left and the corresponding leaf values on the right.

Gallery of Stem and Leaf Plots
Stem and Leaf Plot Image Gallery


We hope this article has helped you learn how to create a stem and leaf plot in Excel using different methods. Whether you prefer to do it manually, using formulas, PivotTables, or VBA macros, there is a method that suits your needs. By following these steps, you can create a stem and leaf plot that helps you visualize the distribution of your data and gain insights into its characteristics.
What's your favorite method for creating a stem and leaf plot in Excel? Share your thoughts and experiences in the comments section below!